Chris's camera pages
How to adjust the rangefinder on a Kodak Retina IIa
Why does the rangefinder need adjusting? The rangefinder can be expected drift out of adjustment just with normal wear and tear, but a major cause of mis-adjustment is simply that the camera has been dropped at some stage. A camera in its leather ERC will rarely show any external damage, but the rangefinder assembly is only held down with two screws, it is not dowelled into place, and relies on friction to prevent it shifting. One good thump and it will shift.
The first task is to gain access to the rangefinder. There are no access holes under the accessory shoe, so you can leave that alone. The whole top cover has to come off, and here are the instructions for removing the top cover.
Very often you will need to remove the r/f in order to clean and lubricate the pivot point before making adjustments, and probably the glass needs cleaning too. If the rangefinder is slow to respond to movements of the focus ring, then it definitely needs cleaning and lubricating before any adjustments are made. Here are the instructions for cleaning the rangefinder.
In the pictures below you will see a rangefinder removed from the body for clarity. To make your adjustments you will need to fit the rangefinder back onto the camera body first.When refitting the rangefinder to the camera body, first apply a little bit of lubricant to the inside face of the tip on the arm. Fix the rangefinder so it is square with the camera body, and tighten the two screws.Note that the tip of the moving arm on the rangefinder should be in front of the screw-post connected to the focus adjustment. As the focus is turned towards the infinity position the screw-post moves towards the back of the camera. The moving arm of the rangefinder is held against this post by its return spring, and so follows its movement.When the focus is turned towards a closer subject, the screw-post moves forward, pulling the rangefinder arm with it.
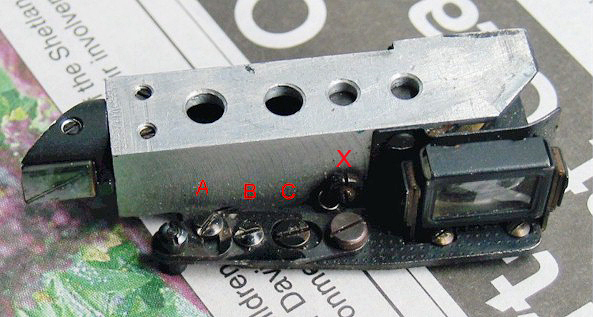
If you have not removed and/or dismantled the rangefinder for cleaning, most likely all that will be required is a simple horizontal infinity adjustment. You will need to slightly loosen the lock screw labelled B in the picture below, turning the larger screw head labelled C one way or the other to bring the images of a suitable distant infinity target into alignment while the camera lens is set at the infinity position.If the images never align at infinity regardless of adjustment of the screw C, then likely the screw marked X is not set correctly. This is the default position of the rangefinder when the arm is completely disconnected from the focus mechanism, as when the front of the camera is closed. Set this by closing the camera front, and adjust the screw marked X until the images are properly aligned on an infinity target. Once this has been achieved you may return to adjusting the rangefinder with screw C so that the images align when the focus is set to infinity, and the images should clearly move from alignment as soon as the focus ring is moved to away from the infinity position.
When you are happy with the horizontal infinity setting, lock it with the lock screw B and recheck. (See below for adjustment for vertical alignment of the rangefinder images if needed)Just a quick note for the inquisitive, the adjustment at A should not need adjusting. It is used to help adjust the rangefinder to ensure it is accurate at both ends of the focus range. It is not prone to falling 'out of adjustment' and very rarely will tampering with it improve the situation.
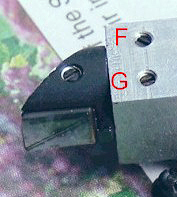
If the rangefinder images are out of vertical alignment then you will need to adjust the angle of the prism visible here. Note that the adjustments needed are very slight, just a fraction of a turn of the screwdriver will make a large difference in the image position.
If the moving image in the finder is too high you will need to slacken the screw at G and tighten the screw at F
If the moving image is too low, then slacken the screw at F and tighten the screw at G